Documentation
Introduction
BrainSharper is a concept map editor that is focused on ease of use and fast sharing of the content you create. This document describes BrainSharper version 0.5 in detail. It will guide you in creating and sharing concept maps.
Purpose
BrainSharper can be used to digitally transmit knowledge and ideas that are hard to communicate with text only. BrainSharper can be used as a
- personal brainstorming tool to reflect over ideas
- visualization tool to communicate complex workflows to your coworkers
- concept map drawing tool to enhance your presentations
Elements
In its current version, BrainSharper supports four basic elements that can be created, used and modified in your concept map. These elements are nodes, connectors, labels and groups.
Nodes
Nodes are the basic building blocks of a concept map. Nodes represent the subjects in your map, the physical and tangible entities you want to represent.
Creating and Editing Nodes
When BrainSharper starts up, it shows an empty canvas. This canvas is your working concept map.
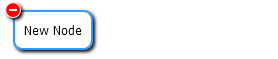
The first thing to do is to place a new node by double clicking the left mouse somewhere on the canvas.
As soon the node is placed, you can change the node's text by typing on the keyboard. Pressing ENTER on your keyboard confirms and stores the text, and if you'd like to change the text later on, double click on the node and start typing again.
To move a node around, click and drag the node to place it somewhere else. Release the mouse when you want to confirm the new placement.
To delete a node click on the (-) sign.
Resizing Nodes
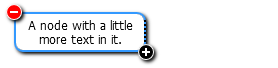
When you entered a lot of text in a node and it's getting too small to hold the text, you may want to change the width of the node.
To change the width of the node, click and drag the gripping area at the right side of the node.
Coloring Nodes
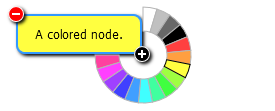
To group nodes into categories, you may want to give your nodes different colors.
To change the color of the node, click the (+) sign and select a color from the fan.
Connectors
Connectors connect nodes with each other. Connectors represent the relations between your subjects.
The current version of BrainSharper supports only one kind of connector: A directed relation from one node to another.
Connectors can connect to any other node, except to itself.
Connecting Nodes
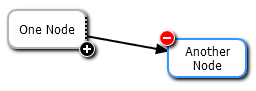
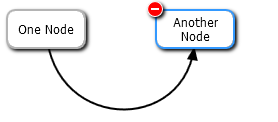
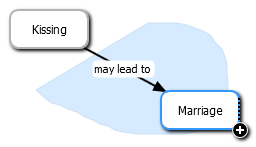
When you move the mouse over a node, a (+) sign appears. To connect one node with another. Click and drag the (+) sign and move the target arrow of the connector on the node you want to connect with.
If you release the mouse on the background instead, a new node will be created and connected to. This is especially useful when you want to create a lot of connected nodes quickly.
Bending Connectors
Connectors can be bent to make your maps more attractive and easier to comprehend. Click and drag the connector to bend its shape.
Reconnecting Nodes
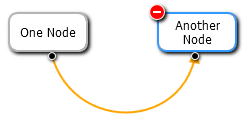
When the mouse is moved over a connector, two pins get visible at both ends of the connector. These are the reconnecting pins.
Click and drag a pin to reconnect the connector's end to any another node.
When you release the mouse button over the background instead, a new node is created and connected to the end.
Deleting Connectors
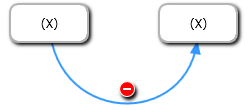
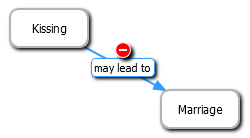
When a connector is focused by clicking it with the left mouse button, it is highlighted in blue and displays a (-) sign next to it.
Click on the (-) sign to delete the connector.
Labels
A connector can be named by placing a label on it. A label represents a verb that connects your subject nodes, or - if your nodes are states - represents a transition process from one state to another.
Placing and Editing Labels
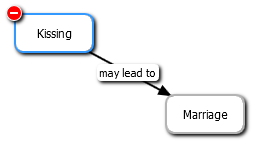
To place a label on a connector, double click on the connector where you want to place the label. You can now enter the label's name or description and confirm it by pressing ENTER on your keyboard.
To edit the text of a label later on, double click the label or its connector.
Moving Labels
Labels can be moved alongside the connector. Click and drag the label to move it. Alternatively, you can double click on a connector with a label to move it to the new position.

Deleting Labels
When a label is focused by clicking the left mouse button, a (-) sign appears on the left, top side on the label. Click the (-) sign to delete the label.
Deleting a Connector and its Label
When a labeled connector is focused by clicking the left mouse button on the connector, a (-) sign appears in the middle on the top side on the label. Click the (-) sign to delete the label and the connector.
Groups
A group is built from an arbitrary set of nodes. Groups can be nested or shared. Any node can be in any group. Use groups to indicate that nearby nodes belong together or constitute a whole.
Grouping Nodes
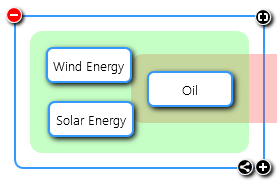
To group multilple nodes, select two or more nodes and click the group button at the right top border of the selection rectangle.
Ungrouping Nodes
Ungroup nodes by selecting them and by clicking the ungroup button.
Moving Groups
Groups and their contained nodes can be selected or moved by clicking or dragging the border of a group.
Coloring Nodes
Like nodes, groups can be colored by clicking on the (+) sign.
Regrouping Nodes
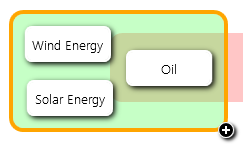
To place a node within a new group, click and drag the node over a new group.
To move a node out of a group, click and drag the node outside the group area and leave the mouse button pressed until the group collapses to its original size.
When multiple nodes are selected, the position where the mouse cursor is pointed to defines in which new groups the nodes are placed in.
Moving the Map
The document canvas can be moved around at any time by clicking and dragging the background with the left mouse button.
Multiple Selection
Multiple nodes can be selected at a time.
By Drawing an Area
A group of nodes can be selected by drawing an area.
To start the area selection process, click and hold the left mouse button on the background, then wait until the new node prototype disappears, and then begin to draw an area around the nodes you want to select.
By CTRL-Clicking Nodes
Nodes can be added or removed to/from the set of the selected nodes by holding CTRL and clicking the left mouse button.
Selecting Everything
Press CTRL-A to select the whole document.
Multiple Selection Area
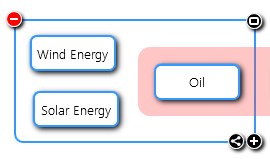
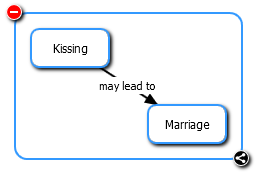
As soon more than one node is selected, a rectangle is drawn around the selected nodes. This rectangle indicates the selected area.
The connections and labels that connect in between the selected nodes are automatically selected, too. Together, they form the partial document that can be manipulated.
Moving the Selection Area
To move the partial document that is contained in the selection. Click and drag either a selected node or the background of the selection area.
Sharing the Selection Area
Click the Share sign that appears at the bottom, right position of the selection area* to save the partial document as a PNG picture to your hard drive.
Alternatively, use CTRL-C to copy a picture of the selection area to the clipboard and CTRL-V to paste it to another program.
Deleting the Selection Area
Click the (-) sign that appears at the top, left position of the selection area to delete all nodes, connectors and labels that are contained in the selection area.
Cut, Copy & Paste
The partial document inside the selection area can be cut or copied to the clipboard and pasted into an other document.
Use CTRL-C to copy the selection area, CTRL-X to copy and then delete it, and CTRL-V to paste it into another document.
Undo & Redo
BrainSharper supports undo and redo for the lifetime of the document. Use the keyboard shortcuts CTRL-Z for Undo and CTRL-Y for Redo.
Focus
Only one node, connector or label can have the focus at any time. To exclusively focus an element, click it with the left mouse button. After that, it is marked as selected (i.e. in blue) and gets a (-) sign attached to it.
Zooming
You can zoom in and out of the the document at any time by rotating the mouse wheel. Clicking the mouse wheel button resets the zoom factor.
Keyboard Shortcuts
Whenever a node, connector with a label, or a label is focused, you can start typing to change its text.
Whenever a focused element or an selection area shows a (-) sign, you can use the DEL key instead of clicking it.
SHIFT-ENTER can be used to enter line-breaks in the node's text.
ESC deselects nodes.
Document Management
While you edit a document, BrainSharper stores all changes to your harddrive so that nothing is lost when your system crashes or you end BrainSharper.
To switch from one document to another in the most convenient way possible, BrainSharper has a document manager built in.
The document manager can be opened by clicking on the right, vertically aligned bar labeled Documents.

Creating a New Document
To create a new document, click on the New link label at the top right corner of the document side bar. You can now edit the name of the document and start creating your map by double clicking inside the document area on the left side.
Switching Between Documents
All your documents are listed in recent-changed order in the document sidebar. Click on the document's name entry to open the document.
Rename a Document
While hovering over a document's name entry, the Rename and Delete labels are shown. Click on the Rename label to rename the current document. Note that the name actually represents the filename of the document, so BrainSharper will reject it if it contains invalid characters or is named like an existing document.
Delete a Document
To delete a document, click the Delete label. BrainSharper will then ask you if you really want to delete the document.
The document is deleted to the Recycle Bin.
Technical Details for the Interested
Where Are the Files?
The documents are stored in My Documents/BrainSharper with the filename extension .brainsharper.
How Are My Documents Stored?
Your documents are stored as a sequence of changes. BrainSharper uses the Event Sourcing pattern to store persistent data.
What Database is Used? Can I Take a Look Into It?
BrainSharper uses SQLite. To take a look into your documents, download the SQLite Database Browser and open one of the .brainsharper files.